Showing posts with label Mama's Country Kitchen Cookbook~Tried and True Favorites. Show all posts

Tuesday, March 21, 2023

New Video! Make No Knead Bread with Me ~


Hello again!

There's a new video on my TJ's Sweet Home YouTube channel, titled:

Make No Knead Bread with Me

If you'd like to pay me a visit over there, I would love to have you!

Here's a summary...

"I planned on doing a voice over but it just didn't work out🙄 I appreciate your patience as I try figuring out all this technology.

{It isn't easy making bread while looking through the lens! I was nervous, lol.😆}

I'm not a professional baker or bread maker, just an everyday home cook. I don't follow the bread making rules but the results always turn out fine.

My breadmaking story:
I began my bread making journey many years ago, first using a bread machine and the boxed bread mixes sold at grocery store. Then I ventured into trying out bread recipes in the machine. We quickly became spoiled to homemade bread! In the next gew years, I went through two bread machines, always declaring that I would NEVER knead bread dough and if for some reason we found ourselves without a bread maker, we would be eating store bought bread. When the second bread machine finally gave up the ghost, I researched the possibility of a "no knead" recipe. Fast forward to now. Fresh hot bread is made at least once a week around here, no bread machine needed.

(Full disclosure: since my son gifted us a KitchenAid mixer, that is what I use to make this dough these days but I made many loaves for a few years without the machine.)

Easy No Knead Bread

2 1/4 tsp active dry yeast
1 1/2 cups warm/"blood temperature " water (I use the hottest water from our tap)
1 tbsp sugar or honey
1 tbsp oil (a light tasting cooking oil of your choice)
3 1/2 cups all purpose flour (plus more as needed to achieve desired dough texture)
2 tsp salt

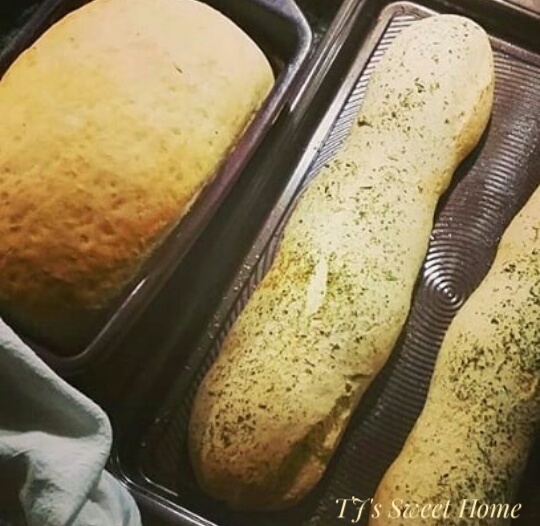
Place ingredients (I rarely take the time to "proof" my yeast🫣) into a large bowl in order listed then mix until the ingredients are well incorporated and has a "shaggy" appearance. Using hands, form the dough into a ball (try to get any stray flour and dough pieces at the bottom of the mixing bowl added to the dough ball. If dough is sticky, add small amounts of flour until, when you handle the dough, it is no longer sticky.). Work the dough ball into an oval shape and until it as smooth as possible. Place dough into a bread pan that's been oiled or sprayed with a baking spray. (No bread pan? No problem! Just shape the dough into a baguette-or two-OR one round shape and bake on a sheet pan that has been lined with parchment paper OR sprayed with a bakers spray OR oiled and sprinkled with cornmeal.) You can leave the dough as is but I usually press mine in.

Now...it's time to let the dough rise (I only do one rise. Again...🫣🤫) to about twice it's size (mine usually takes 1 to 1 1/2 hours). I use my oven that I have warmed up for about a minute but you can place your dough in a warm area covered with a tea towel while it rises.

When the dough has risen, I heat my oven to 375°F (while it is still in the oven) and set the timer for 35 minutes (ovens vary so you may want to start checking at around 20-25 minutes). Your bread is done when it is golden brown and sounds hollow if you tap on it.

Remove from the oven and let sit in the pan for about ten minutes covered with a tea towel before turning the loaf out to cool (I turn my pan on it's side since hubby said that's what his grandma used to do.😊)

Enjoy your bread! (If you can't wait until it's cool...no shame! We've been known to cut into a hot loaf and slather with butter...SO GOOD!. The only down fall is, it doesn't cut as easily/cleanly when it's hot.

*a good serrated bread knife makes cutting easier.

🌹🐞While my dough was rising, I went outside and to my surprise, had a wonderful unexpected visit from a little ladybug. I was also excited to see a few fragrant roses on on our rose bush!"


I suppose I practice a "lazy girl" method of bread baking but if the results turn out well, why bother with extra time-taking steps? I know I could (and do sometimes) make extra special (read: pretty) loaves, but as I stated, I'm a home cook and my main objective each day is to get tasty food prepared for us, all while juggling the other tasks of the day. And I only have so much energy to spare. At the end of the day, the "rustic"😜 looking loaves taste the same as the "pretty" loaves.

I hope you enjoy the video, and as always...

thanks for stopping by! 

xo,

TJ

Tuesday, March 17, 2020

Knead Bread?

Knead (need ;~D) bread and not finding it on store shelves? This is the basic bread recipe I've been useing lately. All you need is yeast, flour, water, oil & salt. And confidence in your basic can-do American spirit.

My cheats? I put it all in my food processor bowl (but have done it without) layering warm water, yeast, oil & sugar/honey, flour then salt, in that order. I don't bother with the cornmeal. I don't slash the top. I normally bake it in a loaf pan but go freeform & herb-y sometimes (have fun!). If I'm feelin' fanschy, I paint the tops with some beaten egg (and save the leftover egg to throw in with the next breakfast of scrambled eggs.)

You can do it!

If you have any questions just ask & I'll try to help.

Happy baking!

And as always, thanks for stopping by! ~TJ

Monday, January 27, 2020

Pizza Night!


We love pizza! But long gone are the days when we had the regular income that allowed us the privilege of going out to eat twice a week like clockwork, and ordering up a couple of pizzas when the mood struck. We can still enjoy pizza that is as delicious as any pizzeria has to offer though, AND at a fraction of the cost since finding a pizza dough recipe that we think rivals any pizza restaurant's. Add a little of my simple pizza sauce (recipe below) and a few favorite toppings (all bought on sale or grown in the garden, of course!) and dinner is served!

The pizza dough recipe I use is this one. Although it is technically a "no knead" recipe, I find whipping up the dough is even faster, and appeals much more to the lazy housewife in me, when I dump the handful of ingredients into the processor bowl of my Ninja and whir it 'til it all satisfyingly comes together in a ball, but...I have done it both ways. The dough does take some time to do it's doughy thing {aka rising}, so plan your pizza party a day in advance (better yet, just keep some dough made up and keep it in the fridge for those impromptu pizza cravings!)!

what's this?!

it's a pizza dough baby! peek-a-boo!

mama's gonna tuck you in for a nap so you can grow big and strong. night-night little one. shhh!

Mamaw's Simple Pizza Sauce

2 cups canned crushed tomatoes  (can use tomato sauce)
1 teaspoon dried oregano
1/2 teaspoon garlic powder 
1/4-1/2 teaspoon dried basil
salt and pepper to taste (optional)

Combine all ingredients. Spread a thin layer on pizza dough before adding toppings. 
*Want to make less sauce? Simply half the recipe, but...keep in mind, any remaining sauce can be frozen and be used for your next pizza party!

Mangia!

Does your family have a regular pizza night? What are your favorite toppings? And if anyone has a tried and true "white pizza" topping/sauce (the garlicky-er😉 the better), please share, as that's my mine and my daughter's favorite. 

Thanks for stopping by! ~TJ

*I would so appreciate it if you would spread the word to friends and family! Every little bit of income I make through this blog via the sale of my aprons, Avon products, or through my affiliate relationships, helps to support my dear hubby and me and this blog! A million thanks friends! 


Monday, June 24, 2019

Daddy's Favorite Cake~


This is how I made the devil's food cake for my husband (Pawpaw as our grandson calls him) for Father's day weekend.  It's very simple and I like to post the recipes I make so that my children and grandchildren can refer back to this blog in the future for any of their favorite recipes and kitchen tips.  If anyone else reading my little blog gets anything useful out of the things I post, well...that's a bonus.

Daddy's Favorite Cake

you will need:
•1 boxed devil's food cake mix (I used one from Aldi but feel free to use your favorite)
•1/4 cup of real mayonnaise  (again I used an Aldi product, but use your favorite)

Prepare the cake according to the directions on the box, blending in the mayonnaise. 
(tip:  I used cold, strong coffee in place of the water that the directions called for on the box)

Bake according to the directions on the cake mix box. 

When the cake is completely cool, add the cream cheese frosting


Cream Cheese Frosting 

you will need:
•8 ounces cream cheese, softened to room temperature 
•1 stick (8 ounces) butter
•1 pound confectioners sugar, sifted
•1 teaspoon vanilla extract 

Blend the cream cheese and the butter with an electric until well blended and fluffy.  Add the powdered sugar and vanilla.  Combine well with the mixer on low speed.  If frosting is too soft, it may be refrigerated for 10-15 minutes to firm up slightly before using.

If you make this cake, I hope you enjoy it!

Thanks for stopping by! ~TJ


Sunday, November 18, 2018

Mama's Country Kitchen French Toast~A Non Recipe

No it ain't purty. But it's delicious and good cheap eats. It's real life around here. And it's what I do with the leftover ends, bits and pieces of our "day old" bread.

French Toast (My Way)

• An egg or so (depends on how much bread I have to use up)
• A sploosh of milk (no, I don't really know what a "sploosh" is)
• A dash of salt 
• A few sprinkles of cinnamon 
• A splash of vanilla extract 
Whisk that all together with something non fancy, like a fork. Or a whisk.
After the egg mixture is well combined, I put a few pieces of that stale (let's be honest here) bread into the milky egg bath to soak a bit (not too long or else it'll fall apart) while I heat up my skillet (or griddle) on a medium, to medium high, heat. When it's good & hot, I plop a few pats of butter in to melt, and then cook up some yummy french toast served with maple syrup for brunch! Mmm Mmm good! 

I would love to hear any french toast tips & tricks that you use!

Thanks for stopping by! ~TJ

Thursday, November 15, 2018

Mama's Country Kitchen Chicken Broth~


A recipe that's not really a recipe...

• Cook the chicken  (in whatever way the occasion calls for. Bake,pan fry, etc.)
• Remove the chicken meat from the bones & add it to salads, recipes, or just stand at the counter nibbling on it, occasionally sharing a piece with your dog that is staring up at you and threatening to leave a puddle of drool on the floor for you to slip and fall in later if you don't. 
But I digress...
• Make broth from the bones. {Chicken bones, water & I add a titch of vinegar because I've read it's supposed to draw out the nutritional goodness from them. Most of the time (because it's fast and easy, and I'm a lazy housewife) I just add herbs and spices and salt & pepper to the broth since they're within arms reach of the stove. } No carrots, celery etc. Just a simple broth. I RARELY add onion so that I can add some of the broth to my pet's food occasionally (onion is supposed to be bad for dogs). If I want onion flavor in a recipe that the broth will be involved in, I can add that later. Then after simmering for 1/2 to one hour or so, cooling and skimming off the fat...
• I freeze the broth in various amounts. 1 cup, 2 cup, and LOTS of cubes made in the ice cube tray(s).

Now...if I'm feelin' wild & wooly, footloose and fancy free, I might take the time to make a "proper" broth. Ya know, #alltheveggies added to the aforementioned stuff, and then slowly, and lovingly😂😂😂, simmer that stuff in my slow cooker all day. Well, 6-8 hours at least. 
But...usually not. 

Do you have any chicken broth makin' tips you'd like to share? Please feel free!

Thanks for stopping by 


Tuesday, March 20, 2018

Last Week and Beautiful Boiled Eggs!

bottle brush tree on our walking path
Last week was filled with time spent in the garden planting seeds and tending plants, taking walks, running errands and cooking as much as possible from our food stores.

In the kitchen, I made a yummy pork stir fry from meat leftover from the pork roast, using asparagus, rice that our DD brought home from a chinese restaurant when she ordered takeout, and other assorted veggies I had on hand.  Also from that pork roast, I made some sauteed cabbage and carrots to go with it, creating another meal. I froze the rest of the pork roast, still on the bone, and plan to make a pork green Chile recipe out of it and serve it with flour tortillas.  I also roasted some chicken legs that I found marked down, and after plucking the meat from the bones (which we enjoyed for dinner a couple of meals), slow cooked the bones in water for a couple of days to make a wonderful, rich chicken broth.  For a sweet treat, I discovered and made, a recipe for a no bake chewy chocolate chip peanut butter granola bar cookie.  I'm hoping to find, and add into rotation, more no bake recipes for this summer, to keep from heating up the house. Along that same train of thought, I'm also toying with the idea of cooking out on our grill more this summer.  But then that would mean that I  would have to be outside in the heat, so I don't know how that will play out.  It sounds good in theory though, as I sit here, comfy and cool in the artificially conditioned air of my cocoon.  We'll see.


Speaking of the kitchen, I found myself boiling a bakers dozen of eggs one evening and, silly as it may sound, I was giddy.  Why?  Well, because since finding a couple of techniques that have transformed the boiled egg process for me, I actually don't dread or mind, boiling and peeling eggs anymore.  

Occasionally, we like a nice platter of deviled eggs, or a vat😉 of egg salad (hey, I learned the art of bulk cooking when I had two hungry, growing boys to feed.  Can't go back now!) to eat in sandwiches, on crackers, or atop a beautiful bed o' greens.  In the past, my poor fingers would be sore from trying to wrestle the shell from the whites, and more often than not, hunks and chunks of egg white would be wasted.  What I would be left with is some mangled eggs that, when going into an egg salad, didn't make for an offensive presentation.  But for deviled eggs, well, you can only imagine the sickly sight. 
these eggs destined for egg salad, no egg flip involved

So, tired of the boiled egg debacles, I set off on a research mission.  Surely, there had to be a better way.  Many tips, tricks and techniques I had tried before.  But then...I found one, then two, that I hadn't.  With much trepidation, and on the verge of giving up boiling eggs for life, (yes, I am being melodramatic) I tried them.  Yes. Yes! YASSSSS!  Fool proof! Beautiful boiled eggs!

"So, tell us TJ!  Quit stringing us along.  What is this world rocking, boiled egg revelation?", I can hear you asking.  Well first, flipping the eggs the night before you plan on boiling them.  Twelve hours ahead of time will do.  It helps to center the yolk and get rid of that air bubble dent.  Just flip 'em upside down in the carton, stick 'em back in the fridge & walk away for the evening.  When the time comes to boil them, use The Pioneer Woman's Easy-to-Peel Eggs technique (thanks for sharing PW, you saved my boiled egg peeling life!).  That's it!  I will say, I would only bother with the egg flip for purty boiled eggs for deviled egg making, or any other time that you want perfect looking eggs.  
simply delicious. a couple of left over boiled eggs sliced on top of buttered, and pan grilled, homemade bread ends and pieces~waste not!

As an added disclaimer, I have only peeled the eggs immediately after boiling and ice bathing them, as per Ree's instuctions.  If you plan on using this info for your Easter egg dyed eggs, when they won't be peeled right away, I can't promise they will peel as easy.  I think that will be my next experiment with this easy to peel technique: leaving them in the shell for a day or two before peeling.  I will report back when I have need for another batch of boiled eggs...

Happy egg boiling and peeling! And...

Thanks for stopping by! ~TJ


Monday, March 19, 2018

Weekend Reflections ~ 3/17/18 - 3/18/18

curious squirrel at the top of this palm
Although all the weather forecasts had called for rain all weekend, Saturday was a beautiful day!  I took advantage of the wonderful weather and decided to sit in the garden while I called my daddy to wish him a happy 76th birthday.  We enjoyed a good, hour long conversation before hanging up.  

Afterwards, while reflecting on the joy of that phone conversation, I set about preparing a pork roast that I put in the slow cooker for the rest of the day and well into the night.  I loosely followed this recipe, leaving out the onion, using 1/4 cup of water, only one tablespoon of liquid smoke and one bay leaf.  The rest of the recipe, I kept the same.

Since the pork roast wasn't intended for Saturday's meal, I made a favorite of my husband's:

 
there's nothing like a time worn, handwritten recipe, bearing the signs of faithful service in many a meals over the years~

I have had this recipe for over twenty years (I'm sure you couldn't tell, right?😄).  I copied it from the book, The Tightwad Gazette when I was just a frugal tyke, learning at the knee of my sensei, Amy Dacyczyn.  I love that is so flexible and can be made in a multitude of ways.  ~*~  We like adding sweet peas (about a half a cup) to ours. ~ Hubby likes a good splash of lemon juice on top right before he digs in. ~*~  It reminds me of one of the dishes that was our assignment in home ec class many, many moons ago.  We love it so much that I always double the recipe so that we have leftovers, as it tastes as good, or better the second time around.  

For the rest of the day, I reseeded a few flower and vegetable seeds that never germinated.

Other than those few things, I read, relaxed and watched a few relaxing videos.  Thanks to a fellow blogger, Rhonda Jean,  I discovered a new Youtube channel, Li Ziqi Channel.  So many relaxing, beautiful videos!


the first "contender" green bean bloom in the garden!
 
red lilies preparing for a showy display 

On Sunday, I spent the day leisurely sowing more flower, herb and vegetable seeds, reading and puttering around the house.
the first husky tomatoes (one plant, two views)
 

After wrapping up dinner, I ended the day laying back in my outdoor chaise lounge, under the sheltering branches of our very fragrant tree and watched the sky as it turned from dove gray to charcoal.  Ducks and other assorted birds flew overhead.  I was hoping to catch a glimpse of a bat or two fluttering to and fro, searching for their evening meal, but there were none to be spotted.  The air and trees were eerily still as I listened to the distant barking of neighborhood dogs, and the occasional meow of my cat that was lounging lazily beside me.  And when the darkness overtook us, Galahad and I went inside to spend a little time with my daughter, who had just gotten in from work, and hear about her day.

Yes, it's a quiet, slow paced life that we have learned to embrace.  It's our new normal, a new season of life that we are trying to gracefully do justice to.  We are content.  We are happy.  Life is good.

I hope your weekend was fulfilling!  I'd love to hear about it.

Thanks for stopping by! ~TJ


Tuesday, February 13, 2018

Crunchies aka South African Crunchies


I'm always on a quest to use items I have on hand to create something yummy.  After having one of those moments I have on occasion, when I feel I should really be eating more oatmeal for the health of it, but also having come to terms with the fact that I don't like the hot breakfast cereal version, I decided that a nice chewy granola type bar would be right up my alley.

There are many versions of this treat, known as South African Crunchies.  I'm not sure if other versions are actually crunchy or if that is just what they are taditionally called (anyone know? please fill me in!), mine are more chewy, which I love.  And, I love the fact that I don't need an electric mixer.  The mixture can be stirred up with a big ol' spoon (meaning I can whip this up when I'm having a late night snack attack without waking up everyone in the house with the whirring of my mixer! Shhhh...)
This is the recipe I made:

Crunchies
2 cups of oats*
1 cup all purpose flour
1 cup coconut***

1 cup butter (2 sticks/16 tbsp)**
1 cup light brown sugar, packed
1 tbsp honey
1 tsp baking soda


Preheat your oven to 325° (Fahrenheit).  Grease a 13" X 9" pan.

In a large mixing bowl, combine oats, flour and coconut.  Melt the butter in a small saucepan over medium low heat.  When melted, add in sugar and honey, stirring occasionally. Bring mixture to a bubble then stir in baking soda and remove from heat.  (Mixture will get frothy.)  Add to dry ingredients and stir until well combined.  Using a spatula or spoon, press the mixture in the pan in an even layer.  Bake for 25-30 minutes or until golden brown.  Let cool, then slice and enjoy!  


Notes~
* I used 1 cup instant and 1 cup of old fashioned oats, but I wouldn't hesitate to try all of one or the other. 
** I used what was left on the papers that my sticks of butter was wrapped in.
*** I used sweetened coconut.
>>> In the future, I may experiment by adding ingredients like chocolate or white chips for a fun twist.

Have you made a version of South African Crunchies? Or if you try this one, I would love to hear about it, along with any tips you may have.

Thanks for stopping by! ~TJ

Monday, November 6, 2017

Slow Cooker "Loaded Baked Potato" Soup Recipe~


A favorite soup of ours for cooler weather is a hearty, stick to your ribs, potato soup.  We consider it a "loaded baked potato" soup.  It's a recipe that I change up slightly  each time I make it, depending on what I may or may not have on hand as far as ingredients and "accessories" (cheese, sour cream, etc.) goes.  It is a recipe that is very forgiving and leaves much room for experimentation.  This soup can be very inexpensive in it's barest-of-bones form, or as rich and decadent as your tastes and pocketbook allow!

Slow Cooker "Loaded Baked Potato" Soup 

•  6-8 medium to large potatoes (uncooked and diced into roughly one inch pieces) *I use enough to cover the bottom of my slow cooker (see in sidebar) completely *I usually use russets that I buy on sale in 5-10 pound bags 

•  1 cup of diced onion *if I don't have fresh onion, I use dried minced onion (1/2-1 tablespoon, or onion powder 1/2-1 teaspoon 

•  4-5 cups of either chicken broth, vegetable broth or water (or a combination) note:  you may need to add more liquid, just make sure the potatoes are covered with liquid to cook in.

•  2-4 garlic cloves, minced or 1/2-1 teaspoon garlic powder/granulated garlic

•  1/4 cup butter or margarine

•  1 teaspoon fresh parsley, chopped fine, or 1 tablespoon of dried parsley 

•  1-2 teaspoons salt (or to taste)

•  pepper to taste (I like white pepper when I have it)

Combine all ingredients listed above into slow cooker, cover and cook approximately 4 hours on high or 8 hours on low, or until potatoes are tender and mash easily with a fork. 
Once potatoes are tender, mash and blend all ingredients  (I like to use my immersion blender to mash and blend directly in the slow cooker but a regular blender could be used as well.  If using a blender, I only fill it about 1/3 full at a time since the ingredients are hot and can expand when blending. Either way, please use caution when blending as ingredients are HOT!

Next, add in:

•  1 cup of either milk, half & half or cream

Optional:  Once soup ingredients are blended, feel free to add your favorite "loaded baked potato" toppings.  We like:

•  sour cream 

•  shredded cheese *we usually have, and use, either colby-jack or a Mexican blend but use what you prefer/have on hand

•  bacon *I usually use my kitchen scissors to cut up several slices of bacon & then cook until crisp but other bacon "bit" products would work

•  chives or green onions, chopped

If you try this recipe, I hope you enjoy it!  If you have any ideas or suggestions on how you would make it adding your own personal touches, please share!  I love learning from others!

Thanks for stopping by!~TJ

* posts may contain affiliate links that allow me to earn a small commission at no additional cost to you.  My family and I appreciate your encouragement and support more than you can imagine! 


Monday, July 31, 2017

Trying My Hand at Sourdough

my baby sourdough after feeding and sitting out overnight

This month, I decided to give sourdough bread making another try.  I attempted making a sourdough starter many years ago but the starter worked it's way to the back of the fridge and promptly out of my thoughts. (It must be fed on a regular basis in order for it to live on and thrive.) RIP sourdough starter.

Recently however, in going along with trying to find more ways to save money, I dug out my old sourdough bread recipe. I regularly make bread, but knew I could forego the expense of buying yeast if I had a trusty starter on my hands. I like to use a starter that I make strictly with flour and water, allowing it to capture wild yeasts from the atmosphere, turning into a fermented batter with the amazing ability to raise bread dough without using a store bought yeast.


I found a starter recipe years ago but have since tweaked it to my liking. (Although this is the recipe I follow, there are many to be found online.)

• In a large plastic or glass container, place 1/2 cup of whole wheat flour with 1/4 cup of spring or filtered water (I use distilled) and combine until smooth. Cover with a coffee filter, cheesecloth or cotton napkin (something that will allow air flow but keep out pests) and secure with a rubber band around the neck of the jar. Let sit undisturbed for the next two days.

• On day three, mix in another 1/2 cup of flour and 1/4 cup of water. Let sit another couple of days.

• On day five, repeat steps from day three. Repeat these same steps on days six and seven.

• On days eight and nine let starter sit. Don'the mix or add anything to it. By day nine you will be able to use your starter.
a closer view of it's bubbly, yeasty goodness

Your starter should smell sour, yeasty, or a bit like beer. To store, place the starter in the fridge in a covered (lidded) plastic or glass container. Try to use the starter at least once a week. At the very least, feed your starter using the same amounts as above in step one. Each time you use some of your starter, remember to feed it again to replace what you used. The more you use it and the older it gets, the better it will work and taste!

Things to keep in mind:

1)  If your starter produces a brownish liquid on top, fear not! Just mix it in and move on with your life.

2)  If your starter develops mold do not use it under any circumstances. Pitch it and start over.

3)  I've read that some have great success getting their starter going by using some rye flour. I don't care to spend the money to try out this theory since I don't know that I would use the rye flour otherwise. And the wheat flour has worked well for me thus far.  But...food for thought.

4)  After I use some starter, I sometimes feed it with white flour and water, sometimes wheat, depending on what's out and handy.

There are many wonderful ways to use sourdough starter beyond breadmaking. I have already made a loaf of bread and pancakes with the starter, although I want to keep experimenting with techniques and recipes. It takes a little more planning and forethought to using sourdough starter in my baking but considering the savings (from not buying yeast regularly) and the health benefits, I feel it's worth it!

I will post the bread and pancakes recipes I used soon!

If you try making sourdough starter or have any handy tips for me on the subject, I would love to hear from you!


Sunday, August 17, 2014

Sunday Morning Smoothie


Sunday Morning Smoothie 
This morning, I decided to have a protein smoothie for breakfast.  My smoothies never
follow a particular recipe (except once when I tried to follow a recipe.  But after several
days of shopping at different stores trying to find the special ingredients-with no luck-I
decided to go back to my way.). My recipe is always just simply recipes of
experimentation. 
I make different types of smoothies: protein smoothies, fruit smoothies and green
smoothies. And as I've mentioned before, I always use what I have on hand. Sometimes
the "experiment" turns out yumilicious and sometimes they turn out, well, not so great. 
This morning was yumilicious.
I used *1 scoop of protein powder, 1/2 teaspoon of matcha green tea powder, a handful of
 
frozen blueberries, most of a whole frozen banana, 4 cubes of frozen plain yogurt (which
 
I freeze when the yogurt is getting close to it's expiration date), 4 frozen strawberries, 1/2
 
cup of apple juice and 1/2 cup of water. At the last minute (and why it's not pictured) I
 
decided to add a tablespoon of ground flax seed for more fiber. I popped all the
 
ingredients in my ninja blender and voila! Breakfast!
Now, I may never make this exact "recipe" again. But only because being the frugal girl
that I am, if I don't have this combo of ingredients on hand again, it ain't gonna happen.
But...there's always tomorrow, and I still have the ingredients...
 
Have a great day y'all!~TJ 


*I purchased all these products myself

Sunday, June 1, 2014

Oatmeal Cream Pie Cake


Oatmeal Cream Pie Cake
I mentioned recently that I came up with an oatmeal cream pie cake recipe that my family adores so I wanted to share the recipe. One, so I don't forget it and two, in case anyone else out there would like to give it a go and become a dessert heroine to anyone who happens to have a fondness for a similar factory made delight. Now I'm not claimin' to have the keys to the oatmeal cream pie kingdom with this recipe. No, there are many others out there so individual tastes may vary. Try 'em all!!! I probably will eventually :) 

Here we go...

Oatmeal Cream Pie Cake

For the cake:

2 1/4 cups AP flour
2 cups ground (in my blender) old fashioned oatmeal (or instant oats can be used)
1 1/2 tsp baking soda
1 tsp cinnamon
1 cup softened butter (let sit at room temp 'til softened)
2 cups brown sugar
4 large eggs
1 tbsp pure vanilla extract

For the cream frosting:
1 1/2 sticks room temperature butter
2 2/3 cups powdered sugar (confectioners)
1/4 cup whipping cream
1 tsp pure vanilla extract
a couple of dashes of sea salt

Now, let the fun begin! Preheat your oven to 350 degrees Fahrenheit.
Spray a 13"x9" baking pan with a baking spray or grease and flour the pan.

Combine first four dry ingredients in a medium sized bowl. Set aside and in a large bowl, cream the softened butter with electric mixer until smooth. Add brown sugar and mix until well combined. Add in eggs and vanilla, blending until well incorporated. Scrape down sides of bowl occasionally to be sure no ingredients are being left out )': 
Add dry ingredients to the butter/sugar mixture and combine well.

Spread the oatmeal dough mixture into your sprayed/greased/floured baking pan and pop that baby into the preheated oven for approximately 25 minutes (or until you can insert a toothpick about an inch from the edge of the pan and it comes out clean). Let cool completely while you make the creamy, dreamy frosting...

Frosting directions:
with your electric mixer, beat the butter until smooth then add the powdered sugar, combining until well incorporated. Add remaining 3 ingredients and blend until well combined. Frost the cake when completely cooled and enjoy!

If you make this, or have any questions, let me know! I love hearing from you!

Thanks for stopping by!~TJ

Monday, June 3, 2013

Food Mood~Summer Fruits & the Dessert Possibilities!

Do you ever get in a "food mood"? I do. And lately I've been in a cobbler kind of mood.

It all started when hubby ordered IHOP's Peaches and Cream Brioche French Toast. That got my mind on peaches. And then peach cobbler.

I couldn't get peach cobbler out of my mind for days. And then when, finally, my po' brain got some blessed relief from thoughts of peach cobbler, we find ourselves in IHOP again. And he orders that dang peaches and cream concoction again. And my obsessive brain grabs hold of visions of peach cobbler, yes...again.

So, I made myself some peach cobbler, stat. And since no one else seemed to have any interest whatsoever in peach cobbler, I ate the whole thing. By myself. Over the course of a few days. I sure did.

And now, just this morning, I ran across some blackberries I had stashed away in the freezer. And that got me to thinkin'...
 
Blackberry
 
COBBLER
 
!!!!!!!!!!
 
Oh yeah!
Blackberry Cobbler~I made it! Couldn't wait!
 
Also, while I was looking in the freezer, I happened to spy some raspberries. And that's got me to thinkin'...
 
Raspberries
 
Mmm mmm!
 
Cobbler?
 
Crumble?
 
Hmmm. Decisions, decisions.
 
The summer fruitiness of it all is making my tummy hungry!
And my mouth water!
 
Happy fruity desserts to all!~TJ

Friday, December 28, 2012

Easy Cheese Danish


After purchasing a store bought cheese danish only to find nary a bit of cheese in the whole thing, I remembered an old recipe hiding in the dark in my pantry in a hand-written family heirloom cookbook that I found abandoned on a dusty shelf in times gone by.
So, I dug it out, added the needed ingredients on my "last chance" before Christmas shopping list. We would have cheese danish on Christmas eve. And Christmas morning if it lasted that long.
I know there are many versions of this but this is the one I know & love.
 
Cheese Danish
 
what you'll need:
2 pkgs crescent rolls (I used Pillsbury)
2 pkgs (8 oz.) cream cheese
1 cup sugar
1 tsp. vanilla
1 egg (separated)
1 cup powdered sugar
2 Tbsp. milk (about)
 
what you'll do:
Lay one pkg. of crescent rolls (unseparated) in a 13"x9" pan. (this is easier at room temp.) Pinch together at seams.
Mix the cream cheese, vanilla, 1 cup regular sugar and the egg yolk together in a bowl (I used an electric hand mixer) until blended smooth & creamy. Pour over rolls in baking pan. Roll second pkg. of crescent rolls out over the top of the cream cheese mixture.Whisk the egg white with a fork or whisk until frothy & brush onto the top crescent roll layer lightly with a pastry brush.
Pop into a preheated oven at 350 degrees Fahrenheit until golden brown (about 30 minutes).
When the pastry is almost done baking, whisk together the powdered sugar & milk in a bowl until well combined & a good consistency for glazing. Drizzle glaze onto pastry while still hot from the oven. Refrigerate until set. Serve at room temperature.
(If you can wait that long ;) this is seriously one of those things I have a hard time stopping eating. Until it's gone.
(but that could be said for many things...)
 
 
whole package of crescent roll contents rolled out into the pan
 
cream cheese, sugar, vanilla and egg yolk
 
above ingredients beaten til smooth
cream cheese mixture pours easily atop crescent roll dough in baking pan before gingerly (ha) spreading out to cover dough completely
 
second package of crescent roll dough being unfurled on top of cream cheese filling
 
done. as good as its gonna get. aim to cover all the filling possible but if it doesn't quite meet each edge, don't worry about it.
 
 frothy egg white 

 
brushing egg white onto dough with one hand while praying I don't drop my camera onto egg white, dough & cream cheese goo from the other
 
confectioners sugar & milk glaze drizzled onto warm, fresh from the oven deliciousness

with glaze spread hither & yon

Now you're supposed to refrigerate but eat at room temperature. What?!!! Who made that up? I cooled it in the  fridge until it wouldn't fall apart when we cut it.
And then we ate it.
The end.